
Devilishly Disabled: From 2D to 3D Graphics
Devilishly Disabled is a company by Matt Emo offering funny t-shirts and humour designed to shock and challenge society’s perception of those with disabilities by using edgy bold and thought provoking designs.
My task for this project involved producing a 2D devil character with humour being expressed. The character needs to be printed onto t-shirts, followed by a 3D model for a potential movie. The requirements for the character were as follows:
- Maximum of 3 colours on each design – red black and white, as its too expensive to print otherwise.
- The character needs to be sat in the chair with a bandaged left leg (like it is in a cast).
- The chair needs to be facing forwards (like the little devil is looking out of a window.
- It needs massive puppy dog eyes on the devil (big black pupils) and a big cheesy grin.
2D Graphics – Planning
Before going straight into Photoshot/Illustrator to design the character, It is highly recommended to sketch some characters first. I was hesitant to actually show this one as my sketch is pretty…well…basic lol. But, this is a process showcase ;)
As you can see below, variations of the character’s faces were roughly sketched and despite some of them not being chosen, they all played a part in identifying which features worked and which didn’t in relation to the final character’s design. One thing I often do is allow my sketches to be very loose and sketch anything that comes into your mind – quite often, the most random ideas are the best! After the drawing/planning stage, I will make sure the proportions are correct once the character is in the vectorising stage.
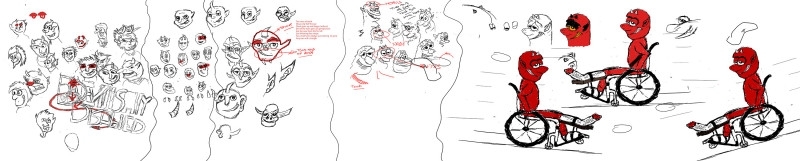
Rough Character Drawings
When a good facial shape is established, I then move onto the next stage which is to work on the facial emotions. This is a very important aspect of any character design. The user needs to have some sort of connection with character which can be achieved in different ways. In this case, it was the devil’s eyes. Without this emotion, the design would be flat.
When undertaking rough sketches, I try to outline or give thicker lines to features that I think need more attention from the viewers eyes. For example, like the nose, big black pupils and big cheesy grin all had a thicker outline to give them more depth.
The same process is applied for each section of the character – to draw anything that comes into your mind and then undertake a process of elimination to find out what doesn’t work. I have f0und this process to work really well regardless of the project requirements. This exact process was used when I was producing the Leopallooza game.
The following sketches show each aspect being taking into consideration.

Initial Sketches Drawn Up
2D Graphics – Vectors
This stage in the project involves producing the line art to bring the character to life. You’ll see here that I define the major parts of the devil character with stronger strokes, allowing the thinner strokes to act as details –the majority of which you probably don’t even notice. So, major elements therefore, like the nose, the big black pupils and big cheesy grin need to have thicker outer strokes. These help to not only create the character style, but to draw the viewer’s eye to the elements I want them to focus on. If everything shared the same stroke weight, the character would be unreadable. Varied stroke weights allow people to instinctively read a character.

Final Vector Version of the Devil Character
As you can see from above, the overall shape/structure and facial expressions of the devil character have been produced. The next stage in the project is to design the t-shirts.
2D Graphics – T-Shirt Designs
The requirements for the t-shirt design were as follows:
- Forward facing shot
- The casters (small front wheels) to be lifted into the air.
- Massive black pupils, big cheesy grin but like the grin is coming out of the side of the devils mouth! (sort of mutely style, the dog from wacky races) out of the side of his grin.
- Speech bubble containing the slogan “Hey Ladies I bet your man can’t do this while he’s walking”
The devil character has been produced in vector format, allowing the character to be scale up. The only additional features required were some lines in the background giving the design/character an effect of motion. Using the path in Illustrator, this was easily achieved, as you can see below.
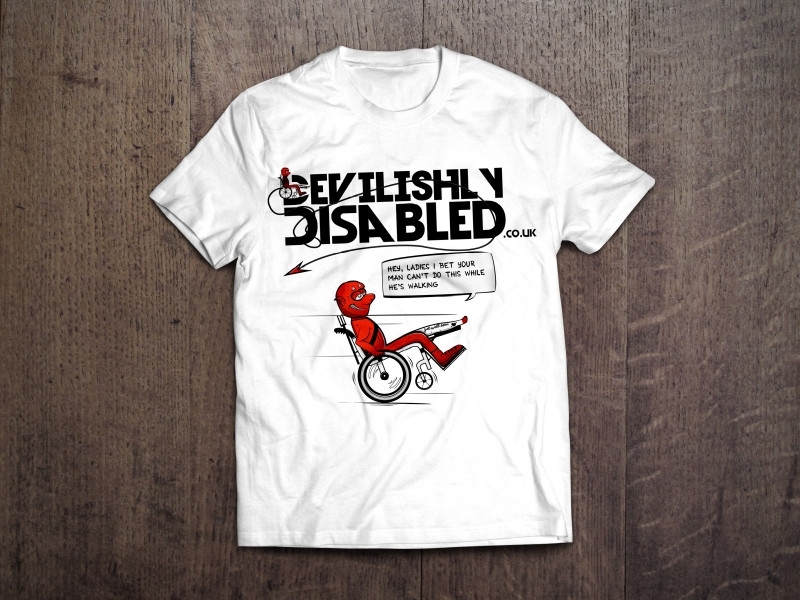
Character T-Shirt Design
3D Graphics – Particle System
As the character is a fury character, a particle system has to be added to achieve this effect. However, even before starting, I knew this was not going to be easy due to all the physics that need to be tested. Similar to water simulations (that I did for Gecko Head Gear) and as with anything being simulated in the real world, anything can happen. For example, if a wind force is applied to the particle system, you need to describe how the particles react to the force. Such as how springy, bouncy the particles become and indeed how many particles are effected. In this case, I had to define particular settings on how much the fur is to be bounced from the 3d Model and how springy the hair particles need to be.
Due to the complexity of the devil model, I decided to test the particle system on a standard uv-sphere shape. This will speed up the baking of the simulation as well as reducing the amount of samples I needed to render. The more vertices (details) you have in your scene the longer it will take to render and thus more samples needed. However, as this scene only has one shape it makes it very easy to render allowing me to see how the light is being bounced/effected on the tip and root of each strand of hair.
A quick render is shown.
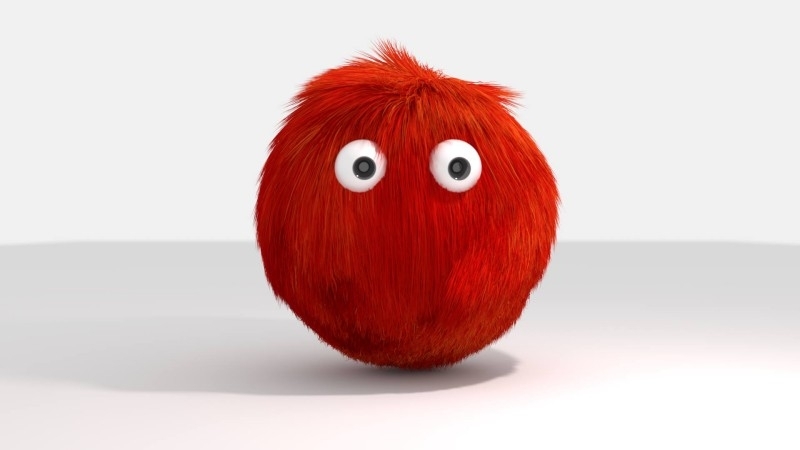
Test 3D Model with Particle Systems
When I was happy with how the particle system was behaving I decided to apply the particle system to the 3D devil model. This render took a lot longer given the complexity of the model and the amount of strands of hairs needed to cover the model.
See below of the final result.
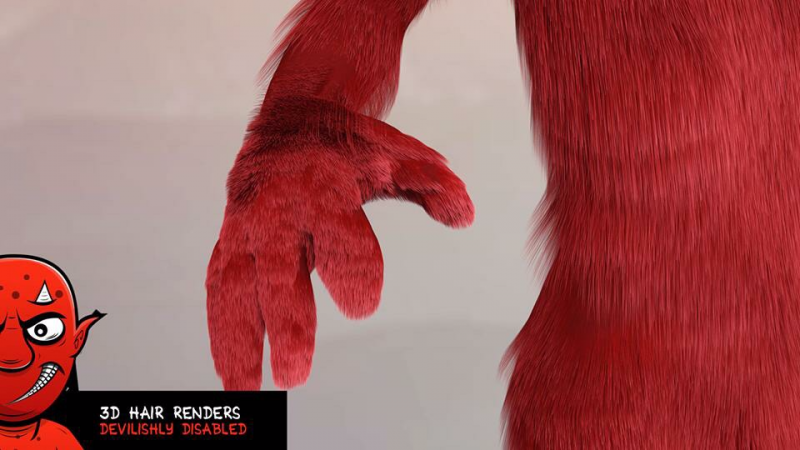
Hair Particle System Produced